French Toast with Kale, Avocado and Tomato Balsamic Jam

20180225_111959

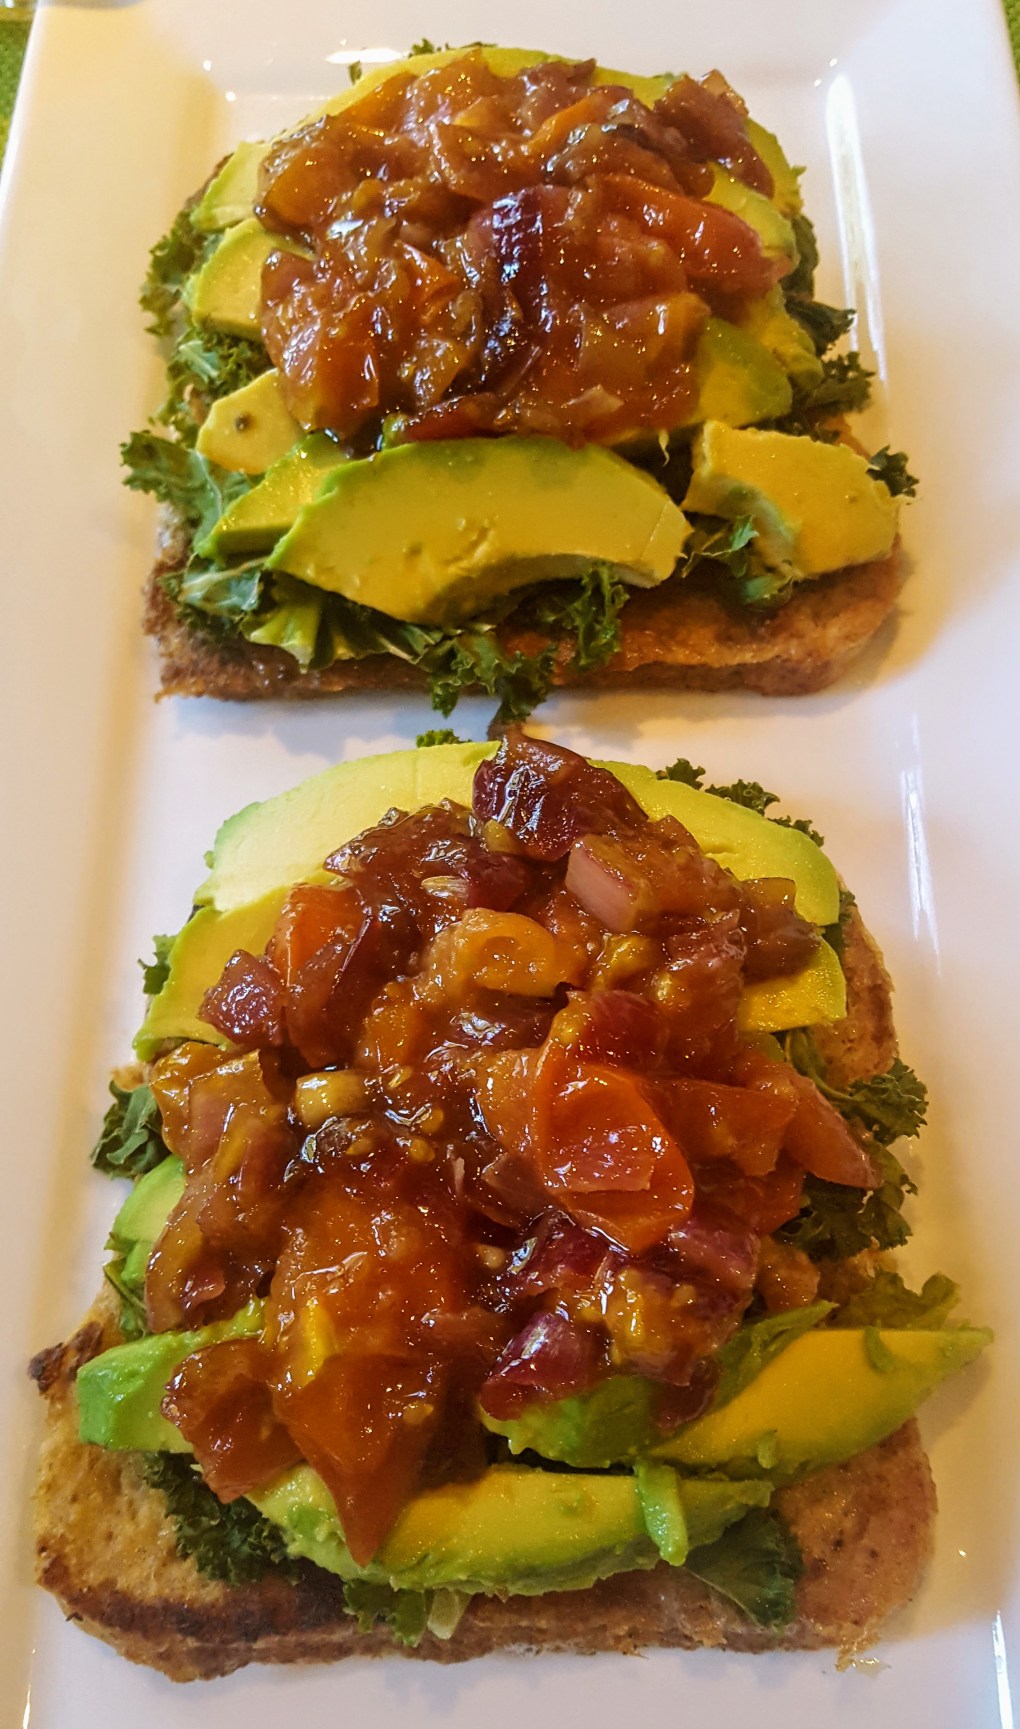
I just love Sunday Brunch time, no alarm, lay in, relaxing morning and a fantastic big breakfast that will keep me going until my Sunday dinner. I couldn’t decide between sweet or savoury this morning, so why not both?? This was an absolute treat and so glad I had some fresh tomatoes as this jam just nailed the dish.


Makes 2 portions

For the Jam

10 cherry tomatoes – 1/4

1 tbsp balsamic vinegar

1 tbsp brown sugar

1 tbsp butter

Sprayoil

1 red onion – finely chopped

For the French Toast

2 slices of bread (I used wholemeal)

1 tbsp butter for frying

2 eggs

Salt & pepper to taste


1 large handful of kale – I steamed cooked mine for 4 minutes, perfect.

1/2 Avocado – sliced


  1. To make the jam:- Heat 1 tbsp butter and some spray oil in a fry pan
  2. Saute the onion on medium heat until tender about 5 minutes
  3. Add brown sugar, stir and cook for a further 3 minutes
  4. Add the tomatoes and balsamic vinegar and cook for a further 5 minutes, remove with a slotted spoon and keep warm
  5. To make the French Toast:- Heat 1 tbsp butter in a fry pan.
  6. Whisk the eggs and season with salt & pepper
  7. Place the slices of bread in the egg mixture and allow to soak for a minute, then place into the hot pan and fry on each side for about 3-4 minutes or until golden brown and crispy.
  8. Steam cook your kale.
  9. Place kale onto toast, then avocado slices then top with the jam.
  10. Serve…….so Yummy!

20180225_111940


Pistachio & Chocolate Chip Cupcakes

20180224_163203

O.M.G!! What can I say………….this little creation is my best yet……absolutely delicious! 10/10 my boyfriend said….lol!

I just love a relaxing saturday afternoon baking, while my boyfriend was watching the Rugby I was listening to my favourite tunes by Imagine Dragons and creating some little afternoon delights.


Makes 12

70g pistachios

140g Golden Caster Sugar

140g Self Raising Flour

140g butter

2 eggs

5 tbsp milk

100g milk or dark chocolate drops (whichever you prefer)

1 tsp vanilla essence

1 tsp almond extract

250g icing sugar

Green food colouring


  1. Preheat oven to 160 deg.
  2. Line a Muffin tin with cases.
  3. Blitz the pistachios in a blender under finely chopped. (keep a little back for decoration)                                                                                 20180224_140031
  4. Mix flour, sugar, butter, eggs, milk, vanilla essence, almond extract and pistachios in an electric mixer until well blended and smooth.                                     20180224_140422
  5. Divide the mixture between the cases and then push some chocolate chips into each one.                                                                             20180224_141340
  6. Bake in the oven for about 23-25 minutes or until a knife comes out clean. Leave to cool on a rack after.                                                20180224_144108
  7. Meanwhile, sift the icing sugar into a bowl and add 1 tbsp at a time of water until you get a thick but still slightly running texture. Then drop 1 or 2 drops of food colour into icing to make a pale green colour.                                                               20180224_142250
  8. Melt some chocolate in the microwave for the decoration. About 1 minute – 1m30secs.
  9. When cakes are cool, top with the icing, then left over pistachios and drizzle with the chocolate. Refrigerate for about 1/2 hr to harden.                                20180224_162744
  10. Then just devour! Oh so Yummy!

20180224_163135


20180224_171700


Spanish Chorizo Tortilla

20180223_184459

Looking in my fridge I had to use up my leftover chorizo, so this was my Friday night quick dinner creation. Very filling, loads of flavour and loads of goodness too. I decided to use my Crisper plate instead of a fry pan then oven and was so glad I did as it only took 15 minutes to cook and more importantly 1 dish to wash up….lol!


Serves 4 (or 2 hungry people)

2 white potatoes

1 sweet potato

Chorizo – I used 1/3 of a 225g ring

1 red onion

6 eggs

1 large handful of kale

1 garlic clove or 2 tsp garlic granules

Salt & ground black pepper to taste


  1. Place a knob of butter on plate and pre heat Crisper Plate on Dynamic crisp setting for 3 minutes.
  2. Slice the potatoes and red onion about 1/2 cm thick 20180223_172351
  3. Slice up the Chorizo not too thick.                                           20180223_181436
  4. Whisk the eggs into a jug/bowl and season.
  5. Place the potatoes onto the crisper plate a start to layer up then season each layer with salt, pepper and garlic.                                                              20180223_182004
  6. Cook on dynamic Crisp setting for 8 minutes
  7. Remove then add on the red onion and chorizo, cook for a further 5 minutes                                                                                       20180223_183050
  8. Remove plate then add on the Kale and pour egg mixture over evenly. Cook for a further 3 minutes.                                                          20180223_183955
  9. Gently remove and serve. Yummy!

20180223_184508_001

20180223_184713

20180223_184839_001


Chocolate Coconut Macaroon Biscuits

I first saw this recipe on Pumpernickelandrye, they looked far too good not to give them a try…………………oh and how I was right, they were delicious, light and very moreish. A very simple recipe that packs flavour and satisfaction. Perfect with a cuppa. (or as my boyfriend says ‘perfect on their own too!’ lol!)

They are more like a biscuit or cookie with a little crunch.

Makes 12

80g Granulated Sugar

3 tbsp plain flour

1/4 tsp salt

200g shredded coconut

3 egg whites

1 tsp almond extract

100g chocolate chips


  1. Preheat oven to 160 deg.
  2. In a bowl mix sugar, flour and salt together then add the coconut.
  3. In a separate bowl whisk together the egg whites and almond extract until foamy but not too stiff.
  4. Pour the egg mixture into the dry mixture and combine until moist.  20180217_153025
  5. Lay parchment paper onto a baking sheet and take 1 heaped tbsp of the mixture and place onto sheet.                                                                                             20180217_153750
  6. Bake in oven for about 20 minutes.                                                               20180217_153850
  7. Meanwhile, melt the chocolate drops in a microwave dish for about 30 seconds intervals until melted.                                                                                             20180217_163727
  8. Once macaroons have baked and cooled completely, dip each one into the chocolate to cover base and set aside. I lay back on tray upside down.
  9. Place the macaroons in the fridge for about 10-15 minutes to allow to chocolate to harden. Once hardened, remove and you can then drizzle more chocolate over the top of the bakes (if you have any left, I only had enough for 2……maybe 150g chocolate drops would be enough to do this.) Allow to harden in fridge.
  10. Serve with a lovely cuppa. Oh so Yummy!

20180217_173833           20180217_173845_00120180217_173935


Sesame Tuna Steaks

20180213_183311

Oh yummy…….Healthy meals a go in my house at the moment, this was a recipe inspired by Jamie Oliver’s 5 ingredient show. I changed it slightly and its 7 ingredients now…lol! It’s been a while since I’ve had tuna steaks and I realised I need to incorporate them more in my meal choices, so delicious and nutritious too.

I cooked these on my crisper plate instead of the fry pan, and in only 3 minutes. A super quick dinner.


Serves 2

2 x tuna steaks

2 tbsps of Sesame and Miso paste, this was a great find. Really good flavour

miso

2 tbsps sesame seeds

100g baby spinach

spring onions

sugar snap peas

1 tbsp Red wine vinegar


  1. Spread each tuna steak with 1 tbsp of miso sauce and sprinkle the sesame seeds all over to cover.
  2. Preheat the crisper plate for 2 minutes and place tuna steaks on and cook for 3 minutes on dynamic crisp setting (no need to turn) – you can also fry in a pan over hob for about 2 minutes each side.
  3. Meanwhile, heat a pan up on hob and fry sugar snap peas and spring onions for a minute with the red wine vinegar.
  4. Place the spinach in the same pan and cover with a lid. Steam for about 3 minutes or until spinach is wilted.
  5. Serve tuna with greens. Yummy!

20180213_183357


Chocolate & Ginger Cake

20180203_191855_001

I wanted to make a ginger cake but came across this recipe from Mary Berry that added cocoa powder, so I decided to give it a try. As there was only 2 of us I made a mini version. The combination of Chocolate and Ginger is just so moreish!


Serves 4 (double quantities for a 20″ size cake)

100g butter at room temperature

25g Cocoa powder

2 tbsp semi skimmed milk

2 medium eggs

90g self raising flour

1 tsp baking powder

1 tsp ground ginger

125 g caster sugar

1 tsp stem ginger

For the topping and filling:-

115g icing sugar

60g butter at room temperature

1 tbsp of stem ginger syrup

1 tsp semi skimmed milk

1 tsp of Stem ginger bits for topping.


  1. Grease and line 2 cake tins, I used 2 x 5″ springform tins.
  2. Preheat oven to 160 deg on fan.
  3.  Put the cocoa powder into a large, heatproof bowl. Stir in 3 tablespoons of boiling water, then add the milk. Mix to make a smooth paste.
  4. Add all the remaining ingredients and mix with an electric whisk for a few minutes, but watch not to over mix as you want it light and fluffy.
  5. Divide the cake mixture evenly between tins and bake in oven for about 25-30 minutes. Then remove and allow to cool in tins for a few minutes before removing to cool completely on a rack.                               20180203_143049
  6. To make the filling, sift the icing sugar into a bowl, add the stem syrup, milk and butter and whisk with an electric mixer until well blended.
  7. Take 1 of the cakes and if needed trim the top of the cake so you have a flat base then spoon some of the mixture on and smooth with a palette knife. Take the other cake and place on top, then spoon the rest of the mixture and smooth with the palette knife. Finally garnish with the stem ginger pieces.
  8. Serve with a lovely cuppa.

20180203_154116

20180203_192032


Chicken & Pasta Bake (with a mexican twist)

20180203_173806

Two exciting things happened today, I used my new pasta toy from Kitchenaid and made fresh pasta for the first time, then I created an amazing bake and baked it using my automatic baked pasta setting on my Hotpoint oven……such a great day in my kitchen today. I love it when new Technology just work!


Serves 2 large portions or 4 smaller portions

150g cooked pasta (see my Fresh pasta Recipe)

2 chicken breasts – cut into bite size pieces

1 yellow and 1 red pepper – cut into slices

1 red onion – cut into wedges

200g Quark

120ml Chicken Stock

1 tsp dried garlic granules

1 tsp smoked paprika

1 tsp cumin

1 tsp dried oregano

Salt & pepper to taste

1 tin chopped tomatoes

Grated Cheddar Cheese – quantity to suit your tastes (We love our cheese here…lol!)


  1. Heat a little oil in a pan on the hob, medium to high heat.
  2. Gently brown the vegetables, chicken, spices and season.
  3. Meanwhile cook your pasta.                                           20180203_155437
  4. Spoon about 2-3 tbsps of the tin tomatoes into a baking dish, then start to layer up the bake. I put pasta on next, then chicken, then vegetables, then rest of tomatoes.
  5. Make up the stock and mix the quark in to make a thick sauce, then pour over the bake in the dish.                     20180203_160435
  6. Set your oven (if you have a Hotpoint Class 9) to Baked Pasta and Cannelloni setting. If not, try 180 deg for approx 25-30 minutes.                 20180203_170123
  7. When you have 15 minutes left, sprinkle on the grated cheese and bake until golden and crisp on top.                                      20180203_172013
  8. Serve. Yummy!

20180203_180741

20180203_18071820180203_180646


Fresh Pasta

20180203_155906

Oh I do love new gadgets that work for you. I got my new pasta attachment for my KitchenAid machine last year and this is the first chance I’ve had to use it. I have to admit I was like a child at Christmas today….lol!

I decided to use the Fettuccine one and make a pasta bake for dinner, I was so pleased and amazed at how easy it is to use. Although I have decided that I need a pasta stand to dry the pasta…….as I use my kitchen doors….lol! #quickthinking


Makes enough for about 4 servings

300g ‘OO’ Pasta Flour

3 eggs

1 tsp olive oil


  1. Pour flour onto a clean dry surface and make a well.
  2. Crack eggs into the well and gently whisk with a fork, then add the olive oil.                                       pasta
  3. Gradually start to fold in the flour to the eggs until you have a dough
  4. Cover with cling film and refrigerate for about 1 hour.
  5. Break up into small handfuls of balls and flatten out with your hand.  20180203_143102
  6. Attached the Pasta Roller first, lightly sprinkle with flour, on speed 1 and level 1 roll the pasta through about 5 times.
  7. Change the level to no. 3 and roll through about 2 times
  8. Change the level to no. 6 and roll through about 1 or 2 times or until the pasta becomes slightly see through. Put to the side and continue with the rest of the pasta.                                                                 20180203_143914
  9. Change the roller attachment to the Fettuccine attachment and roll the pasta through……voila! Perfect Fettuccine.
  10. Leave to dry out then cook in slightly salted boiling water for only 4-5 minutes.

20180203_164643


20180203_155437